Snapchat is a unique messaging app that offers a wide range of features to its users. Snapchat would not have been in today’s place if it weren’t for the amazing unique features it offers. From creating Bitmojis to Lenses, Snapchat has not disappointed us. Snapchat Filter is among those amazing features of Snapchat which have made snapping even cooler.
Snapchat Filter is a design that overlays on your snaps. Filters add color, graphics, background, animations, texts, bitmojis, music, venue, etc. that makes snapping more fun. A great thing about Snapchat is you can use the existing filters or create your own.
To create your own Snapchat filter on the web, login to Snapchat.com and select Create>Get Started>Filters. You can either create your design on the web or upload one. If you want to upload the design you have made, simply import the file by tapping on “Upload.” If you want to design the filter, customize your filter and edit your favorite design with the help of the Filter-Making Tool. Then, schedule, set a geofence, confirm and pay for the filter.
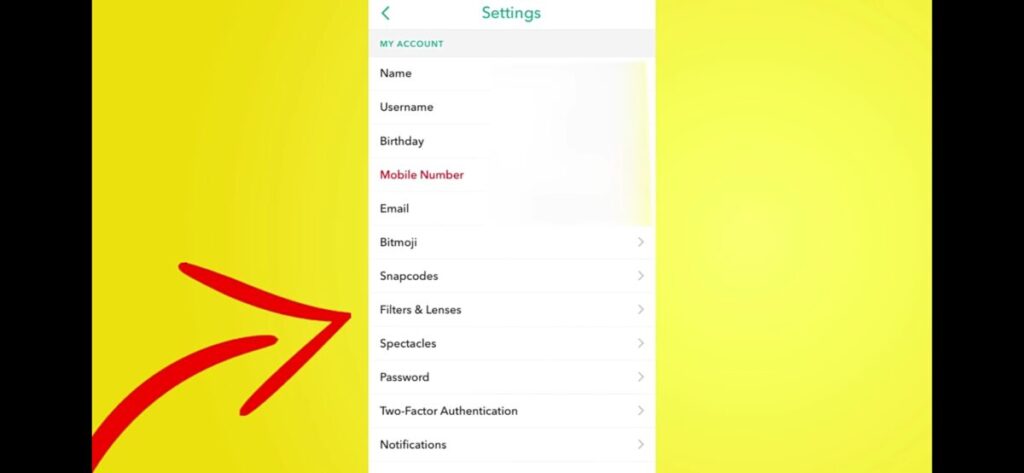
To create Snapchat Filter in the Snapchat app itself, go to Settings> Filters & Lenses>Get Started>Filter. Once you have designed the filter, add elements and pay to save your Snapchat filter.
A lot to process? Below is a detailed explanation of how you can create Snapchat filters.
What Is A Snapchat Filter?
Snapchat Filter is a unique feature developed by Snapchat Inc. that displays an overlay in the pictures or videos taken. Filters add texts, colors, animations, graphics, bitmojis, effects, as well as music to your snaps.
Snapchat gathers the blurred data from different snaps areas and applies different effects, which helps to detect people’s faces.
You can choose the filter of your choice by scrolling left to right from the camera of Snapchat.
Types Of Snapchat Filter
Did you know that Snapchat offered different types of filters? Well, not all the filters in Snapchat are the same. The types of filters are different according to the situations they are used. Therefore, the Snapchat filter is categorized into different types on different bases.
Let’s discuss the different types of Snapchat Filters in brief below:
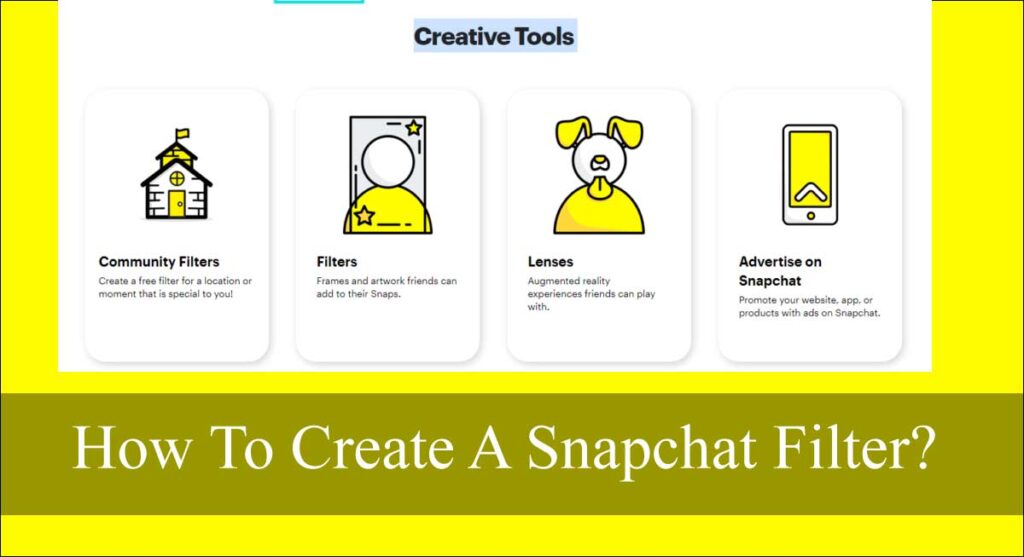
Community Filters
You must have noticed the Snapchat filter that shows up during a specific festival only. The filters appear for a certain period and go MIA. Those filters are what we call Community Filters.
Community Filters are created for a certain community; hence, these filters don’t allow you to have any specific brand or company logos. They are supposed to represent a community and must contain unique animations or graphics. Any community can create community filters for free. Remember, community filters are only available on Snapchat once they are submitted, reviewed, and approved by Team Snapchat.
GeoFilter
Geofilter is the overlays on the snaps that are available within a certain geofence only. A boundary is set over a certain geographic area to cooperate Geofilters. These filters can be meaningful to a certain area only; that’s why the filter designer is supposed to draw a geofence. Geofiler can be fenced from a big city to only a building as well.
Moment Filter
Moment filters are designed for particular moments of the day and can be made available to the whole world. Unlike Geofilters, you don’t need to set a Geofence while creating a Moment Filter. You can create a Moment filter for your birthday, wedding, traveling, etc.
How To Make A Free Snapchat Filter
The only Snapchat filter that you can make free of cost is Community Filter. Snapchat allows creating a community filter using a web browser only. Snapchat does not offer any template for these filters either. You need to create a 100% original filter without the use of any template for it to fit in as a community filter.
Do not get confused; a community filter is a normal Snapchat filter that is relatable to a specific community. Community Filter can be a Geofilter or a Moment filter as well.
Below is the step-by-step guide on how you can create a free Snapchat filter:
Step 1: Open Snapchat On Your Web Browser
Open your web browser and go to Snapchat.com.
Step 2: Choose And Select “Filters & Lenses”
You must see a ribbon menu on the site. Search for “Filters & Lenses” and click the button.
Step 3: Select Community Filters
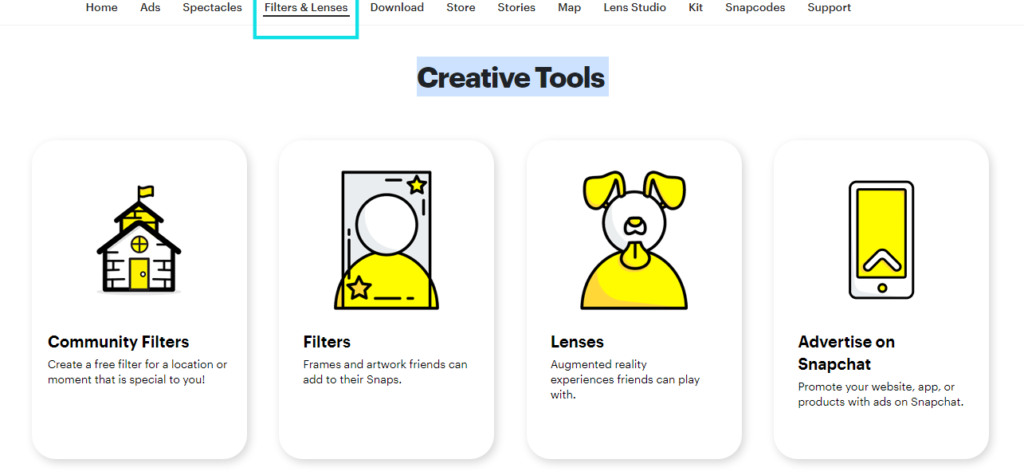
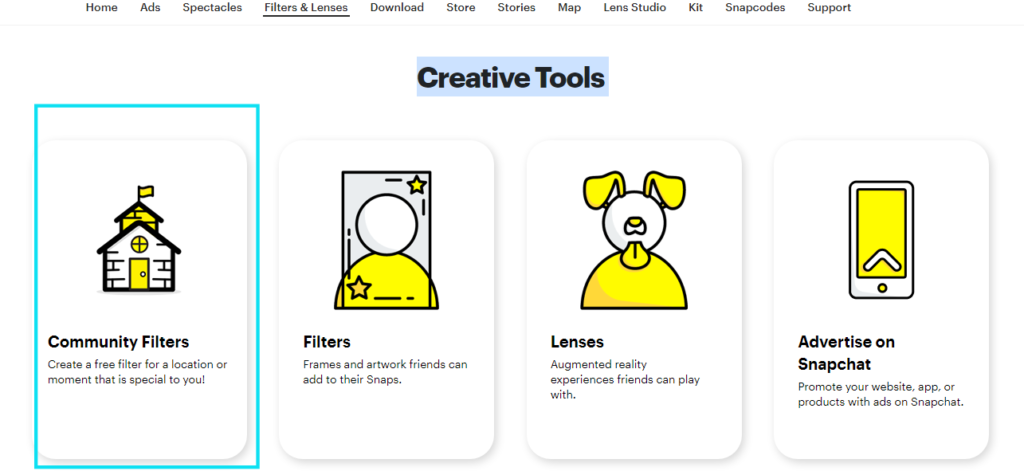
Once you choose “Filters & Lenses” from the box, you must see a list. Scroll down until you find “Creative Tools” and tap on it. Again, inside the “Creative Tools,” you will see an option that says “Community Filter.” Since you are making a community filter, click on the button and select “Community Filter.”
Step 4: Decide Whether To Create A Geofilter Or A Moment Filter
Now, this step may vary according to the purpose of making the Snapchat filter. Analyze whether you want to create a Geofilter or a Moment filter.
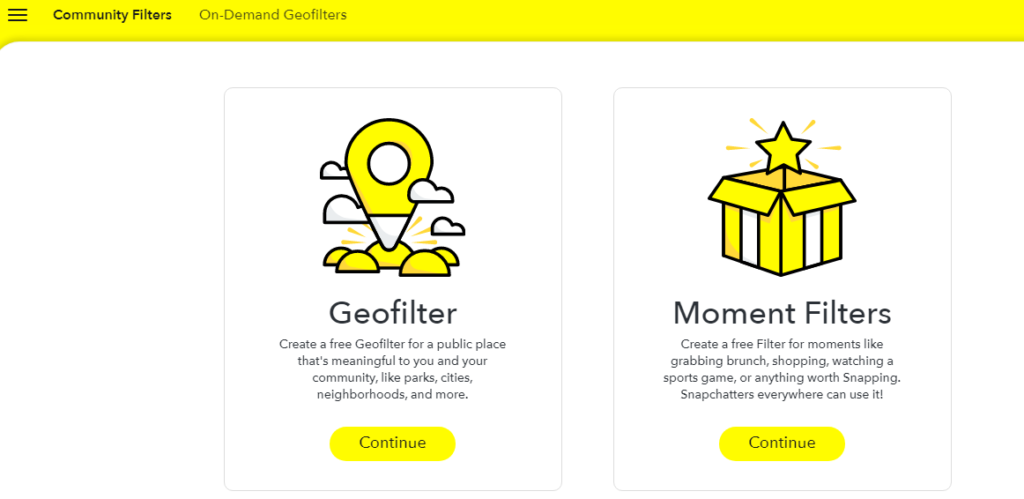
If you have decided on making a Moment filter, quickly jump to Step 6.
And in case you chose to create a geofilter, kindly proceed to Step 5.
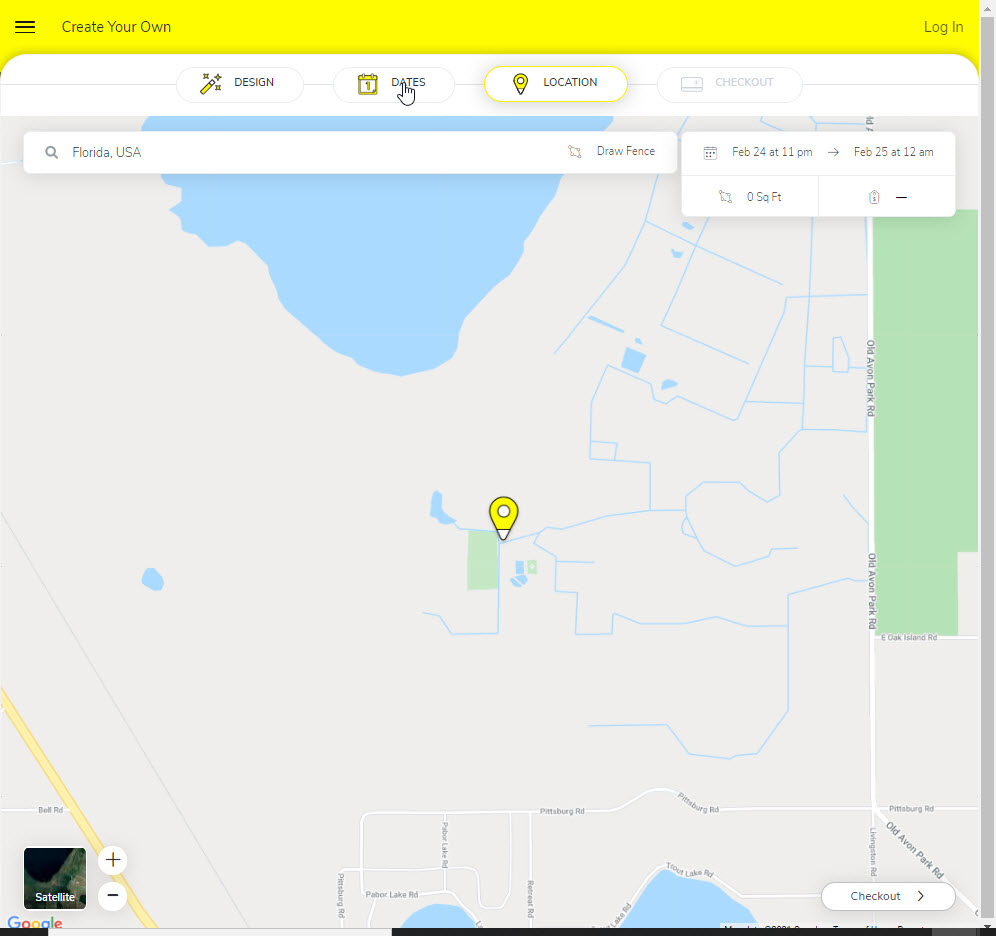
Step 5: Set A Geofence
Once you decide to create a geofilter and select it, Snapchat will take you to the tab where you can draw a geofence. Type the location you want to set for the community filter and then select it. Expand, minimize, drag, and move to adjust the geofence for your Snapchat filter.
Step 6: Upload The Design
Whether you create a Geofilter or a Moment filter, you have to upload your filter design now. Import the design you have created and press “Upload” to upload your community filter.
Note: You can design your filter using software like Adobe Photoshop, Adobe Illustrator, or Canva.
Step 7: Submit The Filter
Now that you have uploaded your design already, you are ready to submit the community filter. You are taken to a new tab once you upload the filter design. Fill in the required credentials, accept the terms and policies and click on the yellow “Submit” button to submit your community filter to the Snapchat team.
Snapchat Team will review your community filter and let you know whether it is approved or not via email.
How To Create A Paid Snapchat Filter Using A Computer
If you are looking forward to creating a Snapchat filter quickly with less effort, I suggest you go for the paid Snapchat filter. You can save yourself some time and effort if you are willing to pay a certain amount for creating a Snapchat filter. Don’t worry; the Snapchat filters are mostly affordable and won’t cost you much.
Here’s how you can create a paid Snapchat filter using a computer:
Step 1: Get Started on Creating Snapchat Filter
To get started, open a web browser on your computer and go to Snapchat.com. Once you log in to Snapchat, you must see a “Create” option in the top menu. Select the button and click on “Get Started” that appears on the next web page.
Since you are creating a Snapchat Filter, open the “Creative Tools” and click on the button that says “Filters.” Once you select “Filters,” you can access the filter-making tool and editing features.
You must see a smartphone-like area on your screen. That’s when you know you are ready to design the Snapchat Filters.
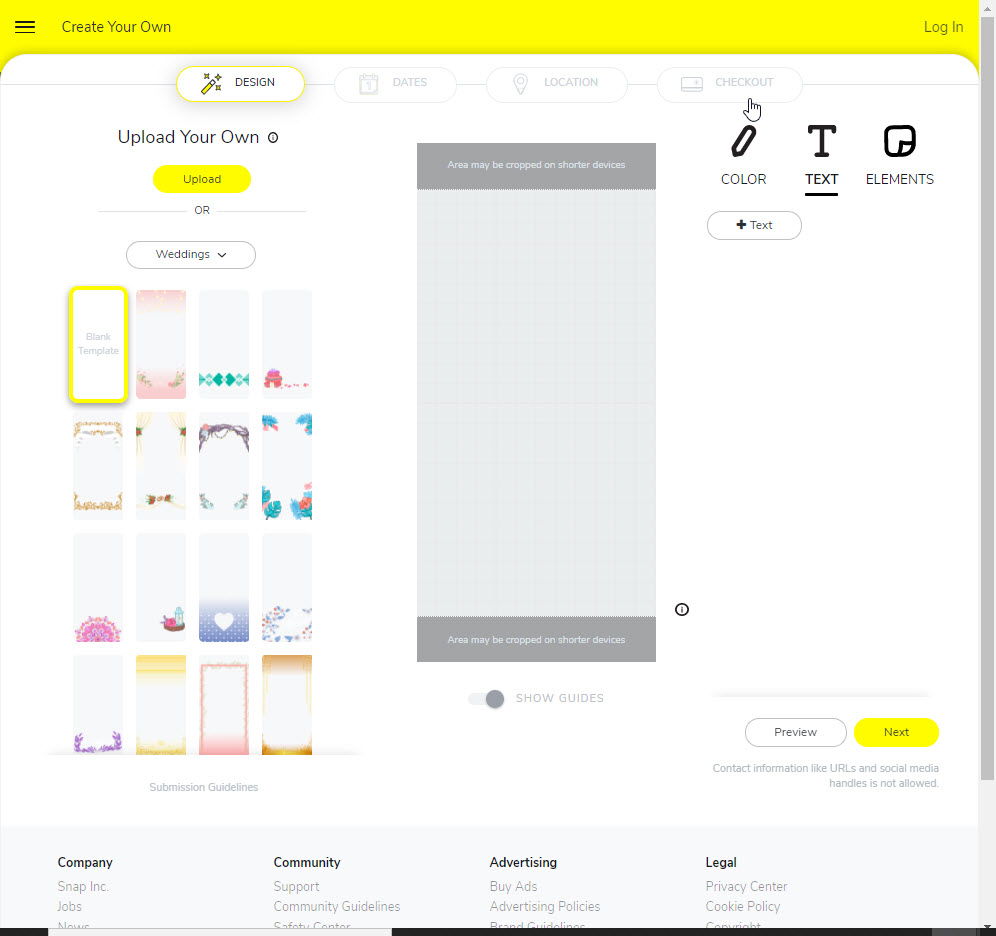
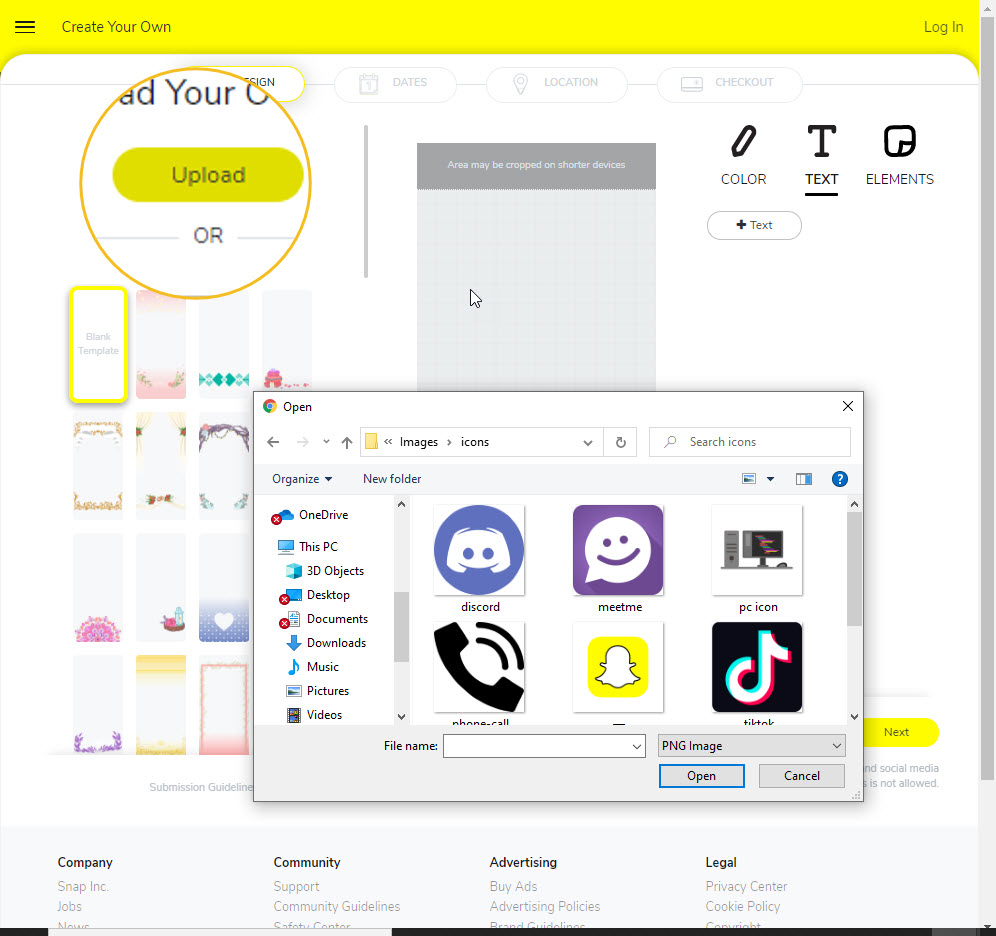
Step 2: Upload Or Create Your Design
You can either create a design on the web or design the filters using Photoshop or Illustrator. If you have created your Snapchat filter design using a third-party tool, all you need to do is upload it. Click on the yellow “Upload” button to import the design you have made.

Criteria For Creating An Authentic Design Of A Snapchat Filter
- The design you create must be saved in a PNG file format.
- The design must have a transparent /clear background.
- The design should not be more than 300KB in size.
- Your design must have the dimensions of 2340×1080 pixels.
Jump to Step number 7 once you upload your filter design.
In case you want to design the Snapchat Filter of your choice using the Snapchat filter-making tool, continue following Step 3.
Step 3: Picking A Theme
Start creating your desired Snapchat filter by picking a theme. You can see a list of themes on the left side of your screen that displays on the dropdown list. You can select your theme among many options like Gameday, Birthday party, wedding, engagement, weaning ceremony, housewarming party, etc.
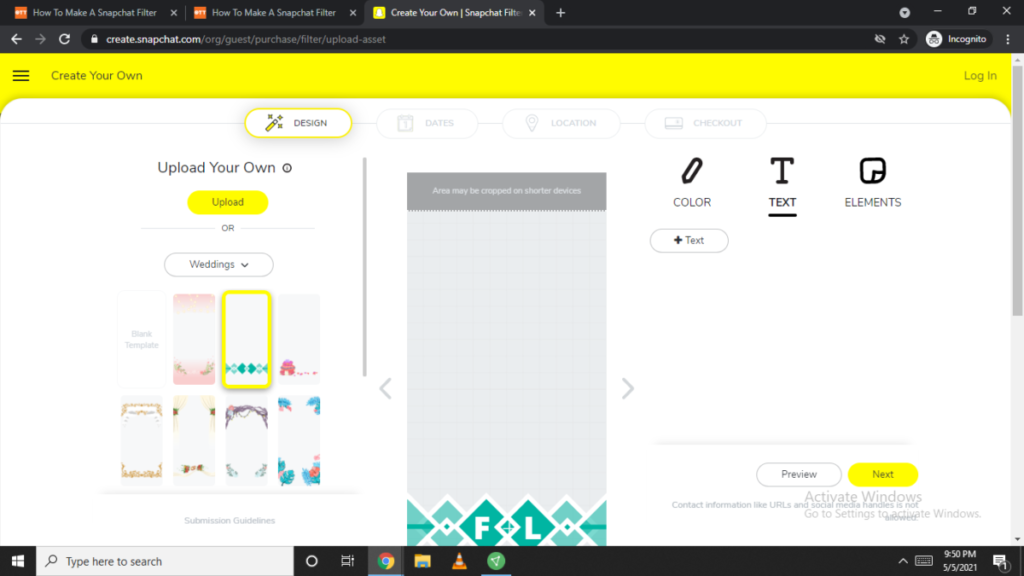
Select a design from the grid to see the preview of your design.
Step 4: Customizing The Theme
You must definitely want to customize the theme you have just selected. You can edit your design by clicking on any part of it. For instance, if you click on the side of the design, you can drop and drag the edit anywhere, be it to the top, bottom, in between, or the other side of your design. Please select the corners of the edit to adjust the size or delete it.
The Snapchat filter-making tool also allows you to change the typeface, alignment, color, and shadow of the text you have already entered in your filter design.
Step 5: Changing The Colors And Schemes
To make your filters look more appealing, change the colors and schemes. The top right corner of your screen should have the “Color” option that allows you to customize the colors for your theme design. Click “Color” and select the color you want for your design.
Note: You can customize the colors in your design for the text and graphics you have chosen too.
Step 6: Adding Your Elements
Is your Snapchat Filter even complete without the addition of any texts and elements? Not really.
So, you may want to add your own elements to give a final touch to your filter. You can see the “Text and Elements” option on the top of your screen right beside the “Color” option.
Select the “Text.+ Text” button if you want to add texts to your Snapchat filter. Edit the texts by clicking on the right of your screen.
To add elements to your design, select “Elements,” click the yellow “Upload” button and import the elements you want to insert into your Snapchat filter. Drag and drop the element in the desired space of your filter. Make sure the element you insert is in PNG file format with transparent background.
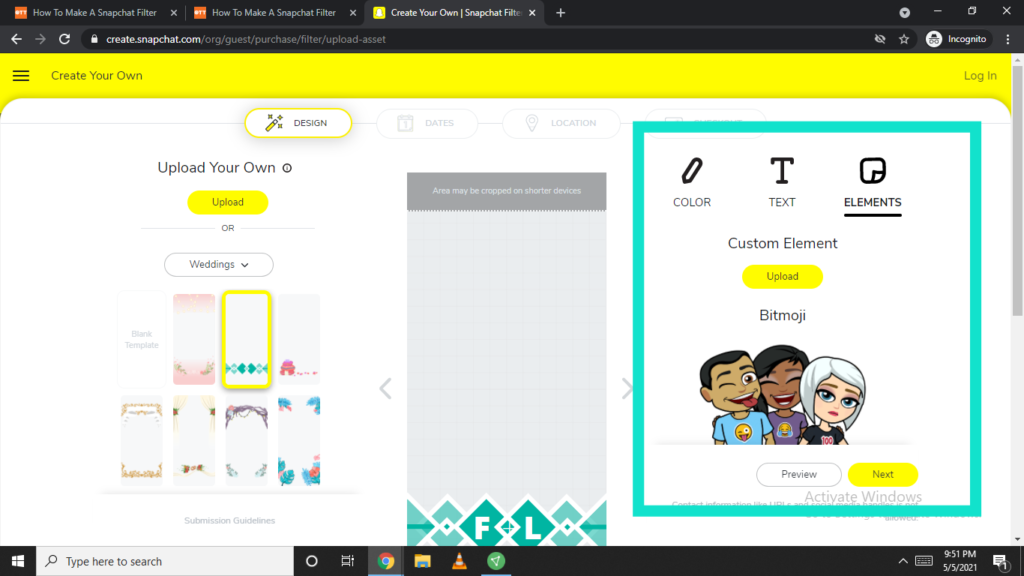
If you want to insert Bitmoji characters in your filter, select the “Log in“ link below the Bitmoji Graphics and connect to your Bitmoji account. You can easily add the Bitmojis once you are connected to your Bitmoji account.
Once you are done designing the filter, select the “Next” button on the bottom right of your screen to proceed further.
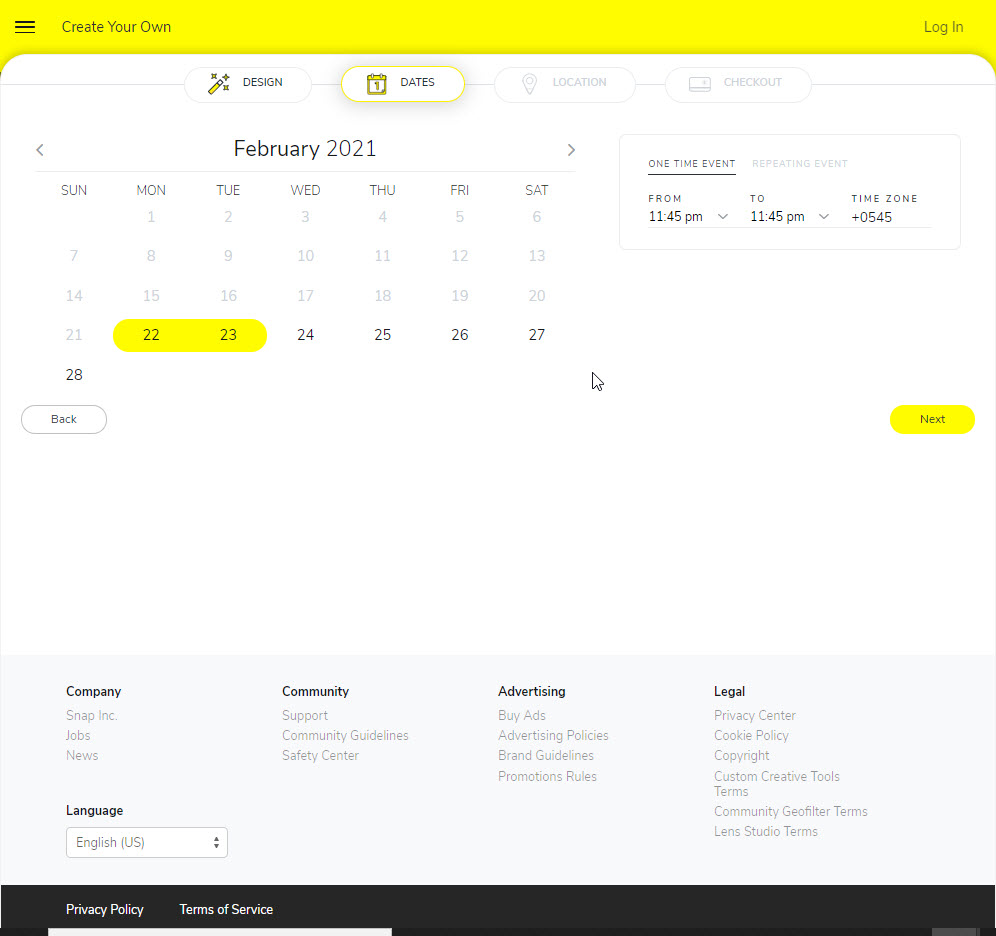
Step 7: Setting Time Period For Filter
If you have reached this step, congratulations!, you have already made it out of the difficult steps to create a Snapchat filter.
Your Snapchat filter can be available on Snapchat for a certain period only. So, you need to set a time frame until when you want your Snapchat filter to existing.
For setting a time period for your filter, you first need to decide whether your filter is a recurring event or a one-time event. If your filter is a recurring event, your filter can be made available in a repeating manner daily or weakly. But, if it is a one-time event, the filter can be available on Snapchat maximum for two days.
Select the date and time you want your filter to operate using a calendar and click on the “Next” button.
Step 8: Scheduling Filter And Drawing Geofence
You can’t choose who views and uses your filter. The Snapchat Filter you create can be made available to a certain geographical area only. All the people in that specific area can access your filter. Any Snapchat user present in the area can use your filter while snapping. You cannot block anyone from using the Snapchat filter you have created.
You should see a dropdown menu containing the address field. Enter and select your desired address there. You will see a square fence around your location. Adjust, expand and select the geofence for a specific location.
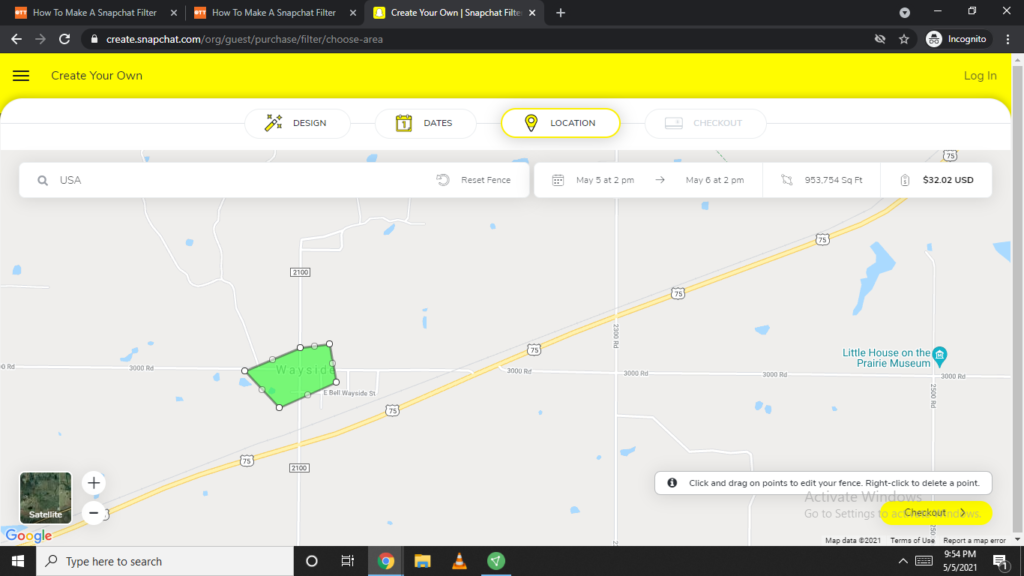
Please click the yellow “Checkout” button that appears in the bottom right of your screen once you are done creating the geofence. You may be asked to confirm the geofence you set by the Snapchat team in case you have made a mistake.
If you don’t want many people to use your Snapchat filter, what you can do is set the geofence to the smallest location possible, i.e., 20,000 square feet. It’s not guaranteed that the other people won’t be able to access your filter, but it surely minimizes the chances. Make sure the venue you select does not turn out to be a public place, as that makes your Snapchat filter accessible to several strangers dwelling around the geofence.
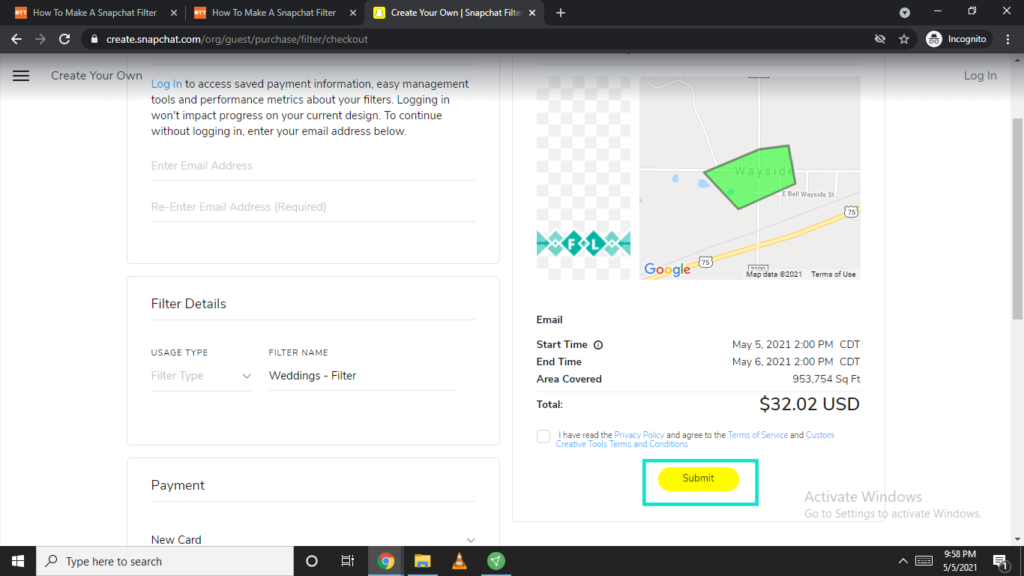
Step 9: Confirm And Pay
Snapchat shows the order summary on the checkout page. To confirm it, you must log in to your Snapchat again in the browser. Fill in the required information such as email address, contact number, filters, details, payment method, and payment information in the fields.
Don’t forget to go through the “Terms and Policies” of Snapchat and click the yellow-colored “Submit” button to send your filter to the Snapchat team for approval.
Your Snapchat filter will be reviewed by Team Snapchat and only be available if it gets approved. You might have to wait for some time till you receive a mail from Team Snapchat.
How To Make Snapchat Filter Using An App
Don’t find the browser so compatible? Don’t worry; you can create a Snapchat filter using the app on your phone as well. You can create a Snapchat filter on both iOS and Android devices. It’s not that difficult to create a Snapchat filter using the Snapchat app. Let’s discuss the procedure to create a Snapchat filter in the Snapchat app briefly below:
Warning: Snapchat Filter functionality on Mobile is not available to users of every geolocation [i.e., only a specific country can access it.] As per unofficial rumors, this feature may be removed from the mobile app on upcoming updates.
Step 1: Get Started
Open the Snapchat app on your device and log in to your account if you haven’t already. Now, tap the profile icon on the upper left corner of your screen to open your Snapchat profile.
Then, tap on the gear button to open the Settings. Scroll down until you see “Filters & Lenses” and tap on it. Navigate Filters & Lenses> Get Started> Filter.
Step 2: Choosing And Customizing A Design
You can’t upload any filter that is designed by using a third-party app. So, the only option that remains is customizing your design. To create your Snapchat filter, open the “What’s the occasion?” tab and select a theme design. The filter you just selected will be displayed on your screen as a preview. You can always tap on the “X” box if you want to cancel the theme and choose a new one.

To bring some editing options, you can tap on different elements of the design while it shows up as a preview. You can edit certain elements on the theme except for some image graphics. Also, try tapping and holding your finger on the elements to drag and drop them to the area you want in your design. You can always pinch your thumb and index finger to adjust the size of your elements.
To add your text, tap on the “T” icon in the top right corner and to add emojis, tap the “Sticker” icon.

Once you are done with designing your filter and happy with how it looks, tap the “Checkmark” button that displays on the bottom right of your screen.
Step 3: Scheduling Filter And Drawing Geofence
You cannot make your Snapchat filter without scheduling it. Your Snapchat filter cannot be submitted to the Snapchat team without setting the time period.
Once you press the “Checkmark” button, a new tab will display on your screen. Tap on “Start Time” and “End Time” to select the tenure for your filter by scrolling the dates and time at the bottom.
There is a perk of creating a Snapchat filter in the Snapchat app itself. You can set a time period for longer than two days. However, you can’t create a recurring event while you are using the Snapchat app.
Tap the “Continue” button once you set time for your Snapchat filter.
You will be taken to the location tab once you set the time for your filter. You must see a field at the top of your screen. Type the location for your filter in the blank space and select the correct one from the dropdown menu. Then, drag and drop your fence into your desired location. Tap the “Continue” button when you are done.
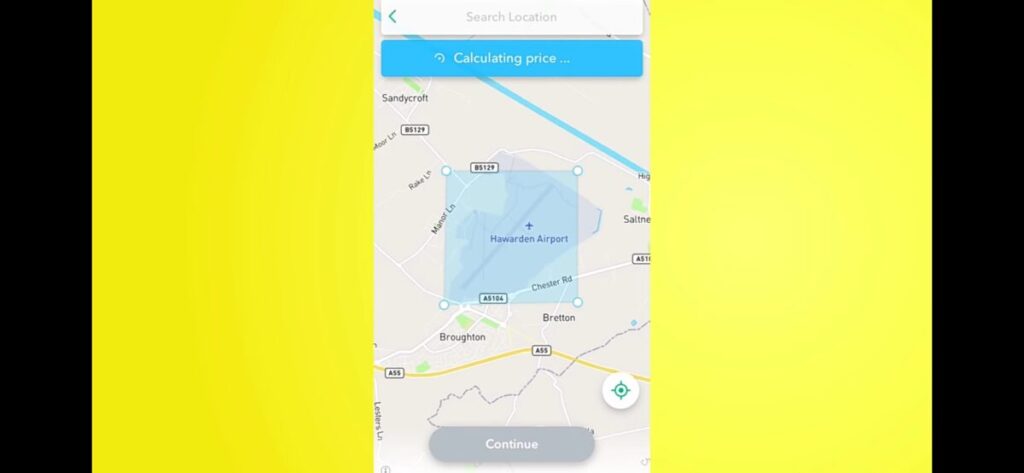
Congratulations! You have just set a Geofence for your Snapchat filter.
Step 4: Confirm And Pay
Just like on the browser, you will see the overall summary of your order on the final tab. If you are happy with what you are seeing on your screen, tap the green button that says “Purchase” to submit the filter to SnapchatTeam.
Don’t forget to enter your payment details.
In case you don’t wanna place your order right now, click on the ”X” button to cancel your order and save it for later.
Snapchat also allows you to create a Geostory so that you can create and name your Geostory event. Geostory is a collection of different stories within the Geofence that anyone can add while being in the location. It’s okay if you don’t want to create the Geostory; it’s completely optional.
Community Snapchat Filters
Snapchat does not allow you to create a community Snapchat filter separately. Instead, you need to create a community filter in the form of geofilters or moment filters using the Snapchat website.
Community filters cannot have templates, so you need to send an original design that follows the Snapchat Geofilter Guidelines.
You can create a community filter using Adobe Photoshop, Adobe Illustrator, or Canva. Make sure you follow the specs of the Snapchat filter. Also, it’s best if you represent the event clearly in the filter you create.
Adding The Existing Snapchat Filters
You can add the existing Snapchat filters on your snap by:
- Capturing a normal snap as you would
- Swiping left and right until you get the desired filter
If you want to access a specific geofilter in your area, please turn on the location feature on our device.
How much does it cost to make a Snapchat filter?
The cost of the Snapchat filter varies according to the area you want your Geofence to accommodate. The cost also varies according to the tenure you select for your Snapchat filter. It’s not possible to tell you the exact cost of making a Snapchat filter, but on average, a Snapchat filter will cost you around $5 to $20 per day per 20,000 square foot.
Are Snapchat filters free?
Snapchat does not charge you while creating a Community filter. A community filter is made to address the occasion of a certain community, not an individual’s. However, if you are considering creating a geofilter or a moment filter, Snapchat charges you a certain amount.
How To Make Your Snapchat Filter Difficult To Disapprove?
Snapchat team receives thousands of new filter requests each day. Only a few get selected. Some filters do not fit into the specs, while some do not fit the required criteria. Whatever the reason is, the disapproval of your filter will disappoint you for sure.
To save you from such disappointment, we have come up with few tips to get your Snapchat filter approved below:
- Creativity is the key. Create a unique design that will attract Snapchat users and make them use the filter time and again.
- Try to be intentional while creating a geofilter. Don’t accommodate unnecessary areas while setting a Geofence.
- Avoid the use of hashtags and photographs. It may not be appealing to the other Snapchat users.
- Make sure your filter does not cover too much space in the snap.
There are high chances Snapchat team will approve your filter if you follow these guidelines in addition to the Snapchat Filter Specs.
How To Make Your Snapchat Filter Successful?
Not all the Snapchat filters get approved and come into operation in Snapchat. Not all the approved Snapchat filters come to use and gain popularity. I know you want your filter to be eye-catching and very successful. How to do it then?
Below are some tips on how you can make your Snapchat filter successful.
Setting A Goal-Oriented Plans
Whatever you do, it is a basic necessity to set a goal. Your hard work may go completely wasted if you don’t set any goal for your work. Randomly designing a filter may not engage a wide range of users. In the worst-case scenario, your filter may not get approved at all. So, it’s best if you set a goal-oriented plan while creating a filter.
Are you a florist trying to make arrangements for Valentine’s Day? If so, starting a filter to place a gentle reminder to Snapchat users would be great before the start of Valentine’s week.
It’s always good to carry a goal before creating a plan as it adds colors to your work.
Thinking From Customers Point Of View
You haven’t created a Snapchat filter for yourself only, have you? It’s the customers who will use your filter. So, it’s always smart to analyze things from the customer’s point of view since they are the actual consumers. While you create your Snapchat filter, put a question in your mind; would you use the Snapchat filter you have made? Would you be happy using it? Would the filter fit your standard? If yes, go for it.
If no, improvise your filter. Try creating something beautiful, recreational, vacation-related, festive, or attractive. Try to create filters that may be relatable to your customers, addressing their mindset.
Following The Specs Of Snapchat
There is no point in creating a Snapchat filter that does not follow the benchmark set by Snapchat itself. Snapchat has some criteria that you need to follow while creating a Snapchat filter. The Snapchat team will obviously disapprove of your Snapchat filter if it does not follow the specifications. So, if you don’t want your work to go in vain, make sure you follow the below specifications while creating your Snapchat filter.
File size: less than 300KB
Dimensons: 1080×2340 pixels
File type: PNG format with a transparent background
Dots per Inch: 72
If you want your filter to be admired by the Snapchat users, make sure your overlays do not cover more than 25% of the screen while taking a snap.
Keeping It Simple
Simple is beautiful. People are trying to stay minimal these days. Overdoing something may turn out to look rough sometimes. What you can do is make your filter simple yet overwhelming. Use your creativity to attract customers with minimal effort.
Your filter will surely gain popularity if you create a simple and beautiful filter. Don’t take up too much space from the snap, and don’t insert tons of elements in your filter. Just target the audience and try to read their mindset on how they would like the Snapchat filter to be.
Frequently Asked Questions(FAQs)
Assuming you have more questions regarding Snapchat, we have picked out some of the most asked questions by you people and answered them below in the FAQ section.
Can I Put A Snapchat Filter On An Existing Photo?
Do you regret not using any filter in the snaps you have already taken?
Do you find the new Snapchat filter fascinating and want to use it on the existing snap?
Good news! You can overlay the Snapchat filters on an existing picture. To do it, upload the existing photo or video to your Snap story and tap on the starry-smiley face that shows up on the top of your screen. Once you tap the icon, you’ll get to apply numbers of Snapchat filters to your existing snap. Select your favorite filter and overlay it over your existing snaps.
Can You Save A Snapchat Filter?
You can save a Snapchat filter. And it’s really easy as well. Snapchat automatically saves a Snapchat filter if you take a snap using it and save the snap. Then, you will easily find the filter when you tap the smiley beside the Camera button on Snapchat.
Can You Send A Saved Picture Or Video As A Direct Snap-On Snapchat?
You cannot send an already saved snap as a direct snap on Snapchat. However, if you send a saved snap to your Snapchat friends, the snap will send as a chat. And yeah, that definitely won’t count to your Snapchat streak.
To send a saved snap to your friend, open Snapchat> tap on memories> select the snap of your choice > hit send.
Conclusion
Now that you have learned how to create a Snapchat filter, you can easily use the skills to custom one depending on the purpose, place, or audience you want to attract. Creating a filter is not too difficult, but it definitely is something you can brag about.
This is a sign for you to create your Snapchat filter if you were looking for one.
Have fun creating your own Snapchat filter, guys.
Happy snapping!
References
Image Reference: https://youtu.be/LlVFYPfhcjc